How to start beekeeping: the complete first-year guide
Beekeeping is one of the most rewarding things you can take on in a backyard, and one of the easiest to start badly. The good news is that the first year follows a clear, predictable shape. You choose a hive, gather a short list of beekeeping equipment, order your bees in winter for spring delivery, install them, and then spend the season learning to read a colony while it builds itself up for winter. This guide walks every one of those decisions in the order they actually arrive, written for a first-year beekeeper who wants the plain version, not the romance.
A note on how I write here. I keep four Langstroth hives in New York's Hudson Valley, I started with a single nuc in 2020, and I lost two colonies over the winter of 2022 — which is ordinary, and worth saying out loud, because nobody told me at the start how normal early losses are. So you will get the honest version: what to buy, what to skip, and where the line is between what a guide like this can tell you and what your state apiarist needs to tell you. Anything to do with disease and treatment, I will send you to the people whose job that is.
One promise up front: I will not call any of this easy, and I will not sell you gear you do not need. The single most expensive year-one mistake — losing a colony — is usually about timing and judgement, not equipment. If you read nothing else, read the section on the first-season timeline.
First, is beekeeping for you?
Before any equipment, a few honest questions. Beekeeping asks for patience, a tolerance for stings (you will be stung; it comes with the work), and a willingness to lift boxes that can weigh forty pounds or more when full. It also asks for a seasonal commitment — weekly-ish inspections through spring and summer, and the discipline to leave the bees alone over winter. None of that is a barrier for most people, but it is worth knowing before you spend.
The best first step costs nothing: find your local beekeeping club and your state apiarist. Every US state has an apiary program, usually run through the state department of agriculture or a land-grant university extension service, and almost every region has a club that runs an introductory short course in late winter. I took the introductory course at Cornell's program and learned more in a weekend than in months of reading. A mentor who has kept bees through a few winters in your climate is worth more than any single piece of gear you can buy.
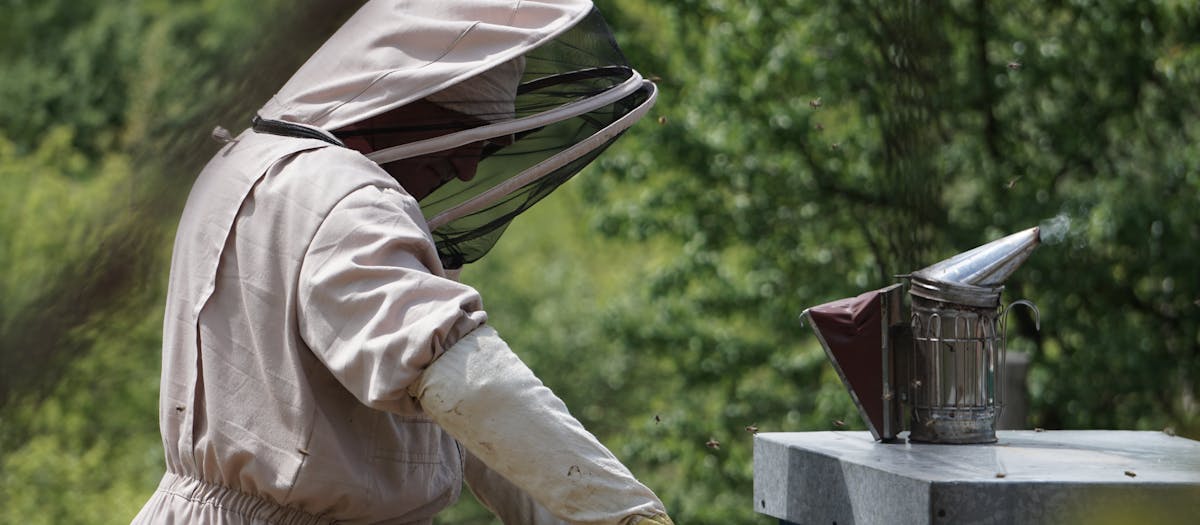
The beekeeping equipment you need
Here is the entire first-season equipment list. It is shorter than the internet suggests. Everything beyond this is either optional or a year-two purchase. The four working parts are a hive, protective gear, inspection tools, and a feeder; bees come separately.
- A hive. The boxes, frames and components your colony lives in. For most US beginners this is a Langstroth hive — the stacked-box hive you picture when you picture a beehive. More on the types below.
- Protective gear. A full suit or a jacket, always with a veil, plus gloves. This is what lets you work calmly, and calm hands keep calm bees.
- A smoker. The single tool that changes an inspection most. A few puffs of cool smoke calms the colony and masks the alarm scent, so the bees stay manageable while you work.
- A hive tool. A flat steel pry bar for separating boxes and lifting frames that the bees have glued down with propolis. Cheap, and used at every visit.
- A feeder. For the first weeks, a new colony often needs sugar syrup to draw comb before nectar flows. A simple feeder gets them started.
That is the cart. The hive is the biggest line item, the protective gear comes next, and the tools are the cheapest and the easiest place to begin a purchase. Each silo on this site goes deep on one part of that list, so you can compare the actual products on the specs that matter rather than guessing from a marketing page.
Choosing a hive: the four types
The hive is the decision people agonise over most, so let me make it simpler. There are four hive styles you will hear about, and for a first-year beekeeper in the US one of them is the sensible default. Here is how they differ.
Langstroth — the standard, and the one I would start on
The Langstroth is the stacked-box hive that dominates American beekeeping. Bees build comb on removable frames inside boxes that you stack vertically as the colony grows. Its great advantages for a beginner are that parts are interchangeable and easy to buy anywhere, every mentor and club uses it so help is easy to find, and you can lift off and inspect one box at a time. The trade-off is that a full box of honey is heavy. This is what I keep, and what I recommend to almost every new beekeeper.
Top bar — gentler on the back, harder to find help for
A top bar hive is a long horizontal box where bees build comb hanging from bars laid across the top, with no frames or foundation. There is no heavy lifting because you never stack boxes, which makes it appealing for anyone with back trouble. The trade-offs are that comb is more fragile, you cannot easily swap parts with Langstroth keepers, and fewer local mentors run them, so you will get less hands-on help.
Warré — a vertical top bar, low-intervention
A Warré hive is a vertical stack of smaller boxes managed with a hands-off philosophy, meant to mimic a hollow tree. Some keepers love the low-intervention approach. For a first year, the catch is that low-intervention also means lower visibility, and a beginner benefits from seeing what is happening inside the hive often. I would not start here.
Flow Hive — clever harvesting, conventional everything else
A Flow Hive is a Langstroth-style hive fitted with special frames that let honey drain out through a tap without opening the box. The harvesting is genuinely clever. But it does nothing to make the hard part of the first year — managing a healthy colony — any easier, and it costs considerably more. It is a fine hive; just do not buy it expecting it to shortcut the beekeeping itself.
8-frame versus 10-frame, deep versus medium
Two more Langstroth choices. 10-frame boxes hold more bees and honey but are heavier; 8-frame boxes hold less and are noticeably lighter to lift, which is why I run 8-frame mediums throughout. Deep boxes are taller and used for the brood nest; medium boxes are shorter and lighter, and many keepers standardise on all-medium boxes so every frame and box is interchangeable. A common beginner-friendly setup is 8-frame medium boxes for the easier lifting and the one-size-fits-all simplicity.
Protective gear before bees
Get your protection sorted before the bees arrive, not the day they do. The point of a suit or jacket is not only to avoid stings — it is to let you stay calm and unhurried in the hive, because nervous, jerky hands make a colony defensive. The two main choices are a full suit versus a jacket, and ventilated versus cotton fabric.
A full suit covers you head to ankle and is the most reassuring for a beginner; a jacket covers the top half and is cooler and quicker to throw on for a short check. Ventilated suits use a three-layer mesh that bees cannot sting through and that breathes far better in summer heat — worth the extra cost if you keep bees through a hot Northeast or Southern summer. Cotton is cheaper and perfectly serviceable but warmer to wear. Always pair either with a veil, and start with gloves while you build confidence; many keepers move to bare or thin-gloved hands later for dexterity.
The inspection tools
The tools are the cheapest part of the whole setup and the part you will touch every single visit. Two are essential from day one: a smoker and a hive tool. A feeder joins them for the first weeks, and a frame grip is a nice-to-have that saves your fingers.
The smoker is the one that changes an inspection most. A few puffs of cool smoke at the entrance and under the lid calms the colony and masks the alarm scent the bees release, so they stay manageable while you work through the frames. A bigger smoker stays lit longer and is easier to keep going than a small one, and a heat shield stops you burning yourself when you set it down. The hive tool is a flat steel bar for prying apart boxes and frames the bees have cemented with propolis — you will use it constantly.
Where to get bees — and the rules
You buy bees, and you order them in winter for spring delivery, because suppliers sell out early. The two ways to start a colony are a package and a nuc.
A package is around three pounds of loose worker bees with a separate caged queen, shaken into a screened box. You install them into an empty hive and they start from scratch. A nuc (short for nucleus colony) is a small, already-working colony on four or five frames, with a laying queen, drawn comb, brood and stores. A nuc has a head start, settles faster, and is more forgiving of a beginner's early mistakes — which is why, for most first-year beekeepers, a nuc is the gentler choice. A package is cheaper and fine if a nuc is hard to source locally.
The first-season timeline
This is the section that matters most, because the biggest year-one mistakes are mistakes of timing. Here is the shape of a typical first season in a four-season climate like mine.
- Winter: Take a club short course. Buy and assemble your hive, gear and tools. Order your bees now for spring.
- Early spring: Your package or nuc arrives. Install the bees, start feeding sugar syrup so they draw comb, and set the hive in a sunny, sheltered spot with the entrance clear.
- Spring into summer: Inspect every week to ten days. You are checking that the queen is laying, that the colony is growing, and that they have room. Add boxes as they fill. This is when you learn to read a hive.
- Late summer: The colony should be strong and storing honey for itself. Begin monitoring for varroa mites — more on that below.
- Autumn: Make sure the colony has enough stored honey to last the winter. Feed if they are light. This is the food they survive on, which is why you do not take it.
- Winter: Leave them alone. Check the entrance is clear of snow and dead bees, heft the hive to gauge stores, and wait for spring.
Keeping a colony healthy — and where my advice stops
Healthy bees are mostly about good management — a strong queen, enough room, enough food — and one thing every US beekeeper now monitors for: varroa mites. Varroa is a parasite that affects nearly all colonies, and managing it is part of normal beekeeping.
Here is where I draw a firm line. I can tell you that monitoring tools exist (alcohol wash and sugar-roll test kits, sticky boards) and that treatment products exist, and you will find those listed factually in the Harvest & Health silo. What I will not do is diagnose a disease for you or tell you what to dose, because that is veterinary territory and getting it wrong harms bees. For identifying disease and deciding on treatment, contact your state apiarist and your local beekeeping association, and follow the manufacturer's instructions on any treatment product exactly.
Who to call — your most valuable resource
No piece of equipment matters as much as the people. Two contacts will carry you through your first year more than any purchase on this site.
- Your state apiarist. Every US state has one, usually through the department of agriculture or a university extension. They inspect, advise, and help with disease. Find yours before you have a problem.
- Your local beekeeping club. A club gives you a mentor who keeps bees in your exact climate, a short course, and a community to ask when something looks wrong. Join before you get bees, not after.
Frequently asked questions
What beekeeping equipment do I actually need to start?
Five things, in order: a hive (a Langstroth starter is the usual first choice), protective gear (a suit or jacket and a veil, plus gloves), a smoker, a hive tool, and a feeder for the first weeks. That is the whole first-season kit. You do not need a honey extractor in year one, because you will not harvest. Most beginners spend somewhere between three and six hundred dollars assembling the hive, gear and tools together.
How much does it cost to start beekeeping?
A first-year setup of one hive, protective gear and the basic tools usually runs three to six hundred dollars, plus the cost of bees. A package or nuc of bees typically adds a hundred and fifty to two hundred and fifty dollars depending on your area and supplier. Harvest equipment, like an extractor, is a year-two purchase and is often shared through a local club rather than bought outright.
Is it better to start with a package or a nuc of bees?
For most first-year beekeepers a nuc is the gentler start. A nuc is a small, already-working colony on frames with a laying queen, drawn comb and brood, so it has a head start. A package is loose bees with a separate caged queen that must establish from scratch. Both work, but a nuc settles faster and is more forgiving of a beginner. Whichever you choose, check USDA and your state import rules before ordering, because moving bees across state lines is regulated.
When can I harvest honey from a new hive?
Not in your first year. A new colony spends its whole first season building comb, raising bees and storing enough honey to survive winter. Taking honey in year one is the most common way beginners lose a colony over winter. Plan to harvest in your second summer, once the colony is established and has a surplus beyond what it needs for itself.
How many hives should a beginner start with?
Two, if you can manage it. A second hive gives you something to compare against, and lets you fix a problem in one colony using resources from the other, like a frame of brood to help a queenless hive. Many people start with one to keep the cost and the learning curve down, and that is fine too. More than two in a first year is usually too much to learn on at once.
What do I do if I think my bees are sick?
Contact your state apiarist and your local beekeeping club. Every US state has an apiary inspector or state apiarist whose job includes helping beekeepers identify and manage disease. We do not diagnose bee disease or recommend treatment doses here, because that is veterinary territory. American Foulbrood in particular is a notifiable disease in most US states — if you suspect it, contact your state apiarist immediately, do not move equipment, and do not treat without inspection.
How much time does beekeeping take?
In the active season, plan on a hive inspection roughly every week to ten days, taking maybe thirty to forty-five minutes per hive once you are practised. There are quiet stretches too — in winter you mostly leave the bees alone and check that entrances are clear. It is a seasonal rhythm rather than a daily chore, which is part of why it suits people with the patience to watch a colony develop.
Do I need a permit to keep bees?
It depends on where you live. Some towns and cities have ordinances on hive numbers, setbacks from property lines, or registration with the state. Many states ask you to register your hives with the agriculture department, which also helps the state apiarist reach you if disease is found nearby. Check your local ordinance and your state agriculture department before you set up, and talk to your local club — they will know the local rules.
Where to go next
The four silos, each starting from a beginner-first hub.